User Guide#
KeePassPasskey turns KeePass into a native Windows 11 passkey provider. Once installed, websites and apps that support passkeys will offer KeePassPasskey as a storage option, and passkeys are saved directly into your KeePass database.
Requirements#
Installation#
See the installation instructions in the README for the full setup steps. After installation, both status indicators in the KeePassPasskey app should show green. You can open the app at any time from the Start menu by searching for “KeePassPasskey” to check or adjust the configuration, or for debugging purposes. You do not need to keep it open: the passkey provider runs as a Windows integration in the background and is activated by Windows whenever a passkey operation is requested.
Updates#
Microsoft Store installs update the app automatically. Only the plugin file is not handled by the Store: after an update, open the app’s Setup Guide, click Show plugin file to install, and replace KeePassPasskey.dll in your KeePass plugins folder with the new one.
GitHub installs are updated the same way as a fresh installation: replace the KeePassPasskey plugin file in your KeePass plugins folder with the new version, then either run InstallMsix.bat as an administrator or install the MSIX package. Replacing the plugin file is a manual step, the installer only handles the MSIX and never writes to your KeePass plugins folder.
Either way, the KeePassPasskey passkey provider in Windows Settings remains enabled from the initial installation and does not need to be re-enabled after an update.
Creating a passkey#
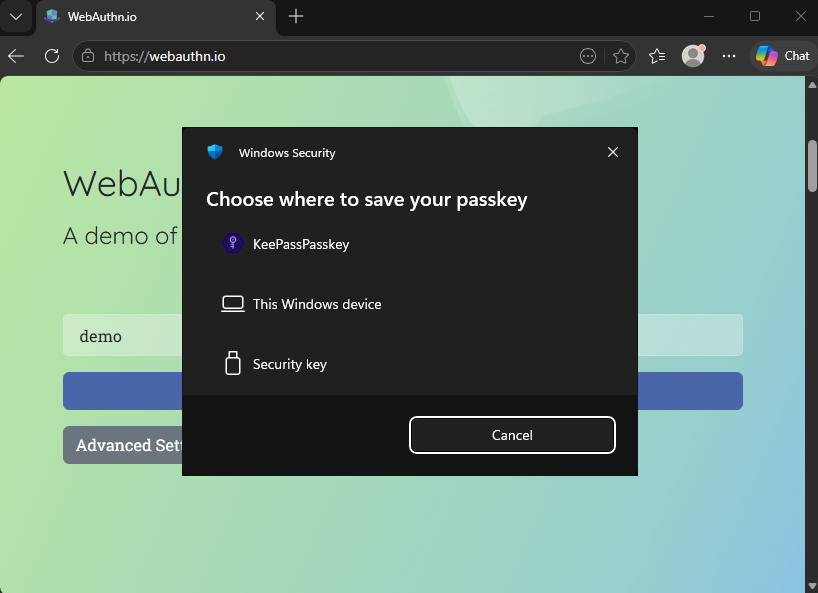
When a website or app asks you to create a passkey, Windows will show a dialog to choose where to save it. KeePassPasskey may not be pre-selected. Follow the steps below.
Step 1: Click Change to select a different provider
Windows shows a “Saving your passkey” dialog. If KeePassPasskey is not listed as the destination, click Change.

Step 2: Select KeePassPasskey
A list of available passkey providers appears. Select KeePassPasskey.
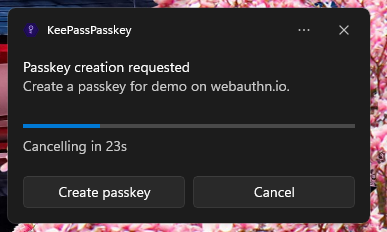
Step 3: Confirm in the KeePassPasskey notification
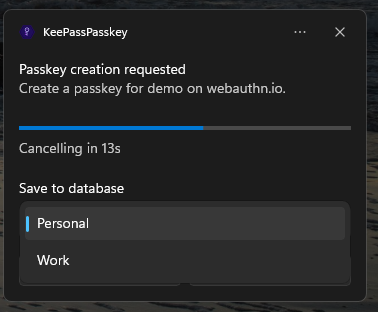
A notification from KeePassPasskey appears in the taskbar. Click Create passkey to save the passkey to your KeePass database. If more than one KeePass database is unlocked, a database picker appears first. Select the database you want to save to.
At most 5 unlocked databases are offered in this picker. This is a Windows limitation: the notification’s selection box cannot hold more than 5 items. If you regularly work with more than 5 databases open, keep only the ones you save passkeys to unlocked.
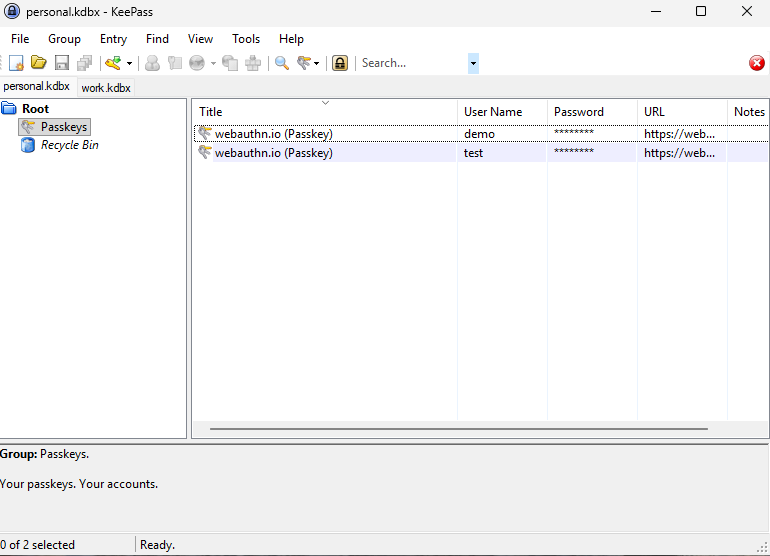
Step 4: Passkey saved in KeePass
The passkey is now stored as an entry in the Passkeys group in your open KeePass database.
Saving a passkey to an existing entry#
If you already have an entry for the website (for example your username and password login), KeePassPasskey can save the new passkey onto that existing entry instead of creating a separate one, so the passkey lives next to your login.
When matching entries are found, the creation notification shows an extra Add to existing button next to Create passkey. Choosing it opens a second notification listing the matching entries. The entry you currently have selected in KeePass is listed first and labelled [selected]; entries that already hold a passkey are labelled [overwrite passkey] (both when applicable: [selected, overwrite passkey]). Pick one and confirm to write the passkey onto it.
At most 5 matching entries are offered. This is a Windows limitation: the notification’s selection box cannot hold more than 5 items. When more than 5 entries match, the most relevant are shown first: your selected entry, then entries already holding a passkey for this site, then entries matched by their URL.
Matching is by website: an entry qualifies when it already holds a passkey for this site, or when its URL field points at the same site (the same domain or a subdomain). If you overwrite an entry that already had a passkey, the previous version is kept in that entry’s History tab so you can restore it.
This is controlled by the Offer saving to an existing entry setting (on by default). Turn it off to always create new entries.
Signing in with a passkey#
KeePassPasskey searches all open databases during sign-in, so you do not need to switch to a particular database first.
Login with a passkey instead of a password#
Some sites let you sign in with a passkey directly, without entering a password. The site may ask for your username first, or offer a dedicated “Sign in with a passkey” button.
Step 1: Select your passkey from autofill or enter your username
Click on the username field. The browser may show a list of saved passkeys as autofill suggestions. Select your passkey from the list, or enter your username and click the passkey sign-in option.
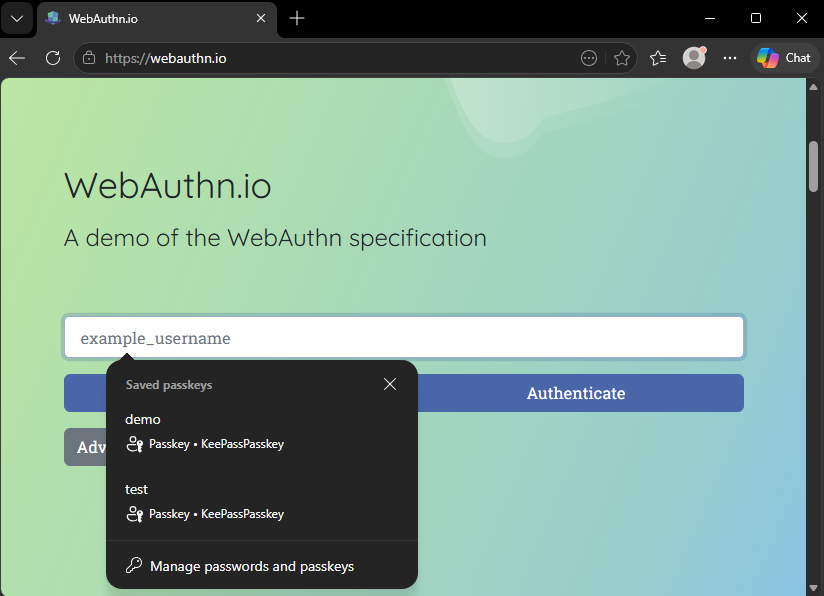
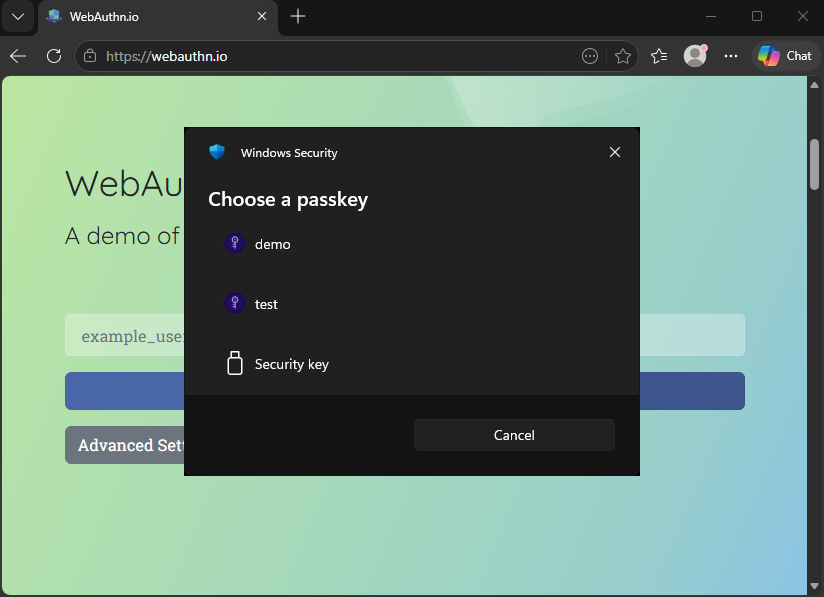
Step 2: Select a passkey (only if multiple are saved for this site)
If you did not use autofill and have multiple passkeys for this site, Windows shows a list. Select the one you want to use.
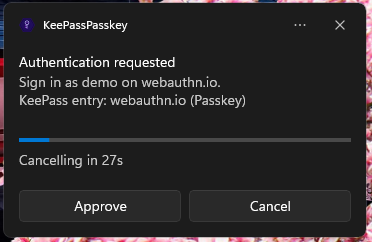
Step 3: Approve in the KeePassPasskey notification
A KeePassPasskey notification appears in the taskbar. Click Approve to confirm.
Login with a password and passkey as a second factor#
Some sites use a passkey as a second factor after you have entered your password.
Step 1: Enter your username and password
Enter your username and password as usual and submit the login form.
Step 2: Select the passkey option as second factor
When prompted for a second factor, select the passkey option.
Step 3: Select a passkey (only if multiple are saved for this site)
If you have multiple passkeys for this site, Windows shows a list. Select the one you want to use.
Step 4: Approve in the KeePassPasskey notification
A KeePassPasskey notification appears in the taskbar. Click Approve to confirm.
Managing passkeys in KeePass#
Passkeys are stored as standard KeePass entries in the Passkeys group.
Organising passkey entries#
Passkey entries can be freely renamed or moved to any group in KeePass without affecting functionality. The Passkeys group itself can also be renamed.
If a group has searching disabled in KeePass, passkey entries inside it will not be found by KeePassPasskey.
If multiple entries exist for the same site, KeePassPasskey uses the first one it finds during sign-in. Avoid duplicates by checking the Passkeys group before registering again on a site.
Moving or copying a passkey between entries#
You can move or copy the passkey data from one entry to another, for example to attach a passkey to your existing login entry for a site, or to relocate one that was saved to the wrong entry or database. Right-click a passkey entry to open the Passkey submenu:
- Cut Passkey, then right-click the destination entry and choose Paste Passkey Here, moves the passkey. It is removed from the source entry only after the paste succeeds.
- Copy Passkey, then Paste Passkey Here, duplicates the passkey and leaves it on the source entry. The passkey stays on the clipboard, so you can paste it onto several entries in a row.
This works across open databases: cut or copy in one database, switch to another open database, then paste.
Both entries keep their History. The destination entry is backed up before the passkey is written onto it, so if it already held a passkey the previous version can be restored; when moving, the source entry is backed up before its passkey is removed. Pasting onto an entry that already has a passkey asks you to confirm the replacement first. The destination’s URL and User name are filled in only when empty, so any login details you already entered there are preserved.
Deleting a passkey#
To delete a passkey, delete its KeePass entry.
To remove the passkey but keep the entry, for example an entry that also holds your password login, right-click it and choose Passkey → Remove Passkey. KeePassPasskey asks you to confirm, then strips the passkey fields while leaving the rest of the entry intact. The removed passkey is saved to the entry’s History first, so you can restore it from there if you need it back.
Deleted entries move to the KeePass Recycle Bin, which has searching disabled by default, so KeePassPasskey stops finding the passkey as soon as it lands there. To restore a deleted passkey, move its entry out of the Recycle Bin into another group.
Passkey entry format#
KeePassPasskey identifies an entry as a passkey by the presence of the KPEX_PASSKEY_CREDENTIAL_ID and KPEX_PASSKEY_RELYING_PARTY fields. An entry without these fields will not be recognised as a passkey, regardless of which group it is in.
Each passkey entry contains these custom fields:
| Field | Content |
|---|---|
KPEX_PASSKEY_CREDENTIAL_ID | Passkey identifier |
KPEX_PASSKEY_PRIVATE_KEY_PEM | Private key (keep this secret) |
KPEX_PASSKEY_RELYING_PARTY | Website domain (e.g. github.com) |
KPEX_PASSKEY_USERNAME | Username used during registration |
KPEX_PASSKEY_USER_HANDLE | User identifier from the website |
KPEX_PASSKEY_FLAG_BE | Backup Eligibility flag (1/0, default 1) |
KPEX_PASSKEY_FLAG_BS | Backup State flag (1/0, default 1) |
Passkeys created by KeePassXC are stored in the same format and are fully compatible.
Settings#
Open the KeePassPasskey app from the Start menu and navigate to Settings.
Appearance#
Theme: choose between System (follows Windows), Light, or Dark.
System tray icon: when enabled, closing the window keeps the app running in the tray. The passkey provider continues to work regardless of whether the app is open.
Notifications & User Verification#
Controls how KeePassPasskey confirms your identity before completing a passkey operation.
| Option | Behavior |
|---|---|
| Notification | Shows a notification you must approve |
| Windows Hello | Requires Windows Hello (PIN, fingerprint, or face) |
| Both | Requires both a notification approval and Windows Hello (default) |
| None | No confirmation required: passkey operations complete silently |
Separate settings exist for Registration (creating a passkey) and Sign-in (using a passkey). The Approval timeout controls how long the notification stays open before the operation is cancelled (default: 30 seconds). This timeout only applies when the approval mode includes Notification.
Show error notifications: when enabled, KeePassPasskey shows a detailed notification if a passkey operation fails. Windows always shows its own generic error regardless of this setting.
Passkey Entries#
Controls how new passkey entries are created in your database.
Save new passkeys in: where a newly created passkey entry is placed. Passkeys group (default) stores it in the dedicated Passkeys group, which is created automatically if it does not exist. Selected group stores it in the group currently selected in the KeePass group tree, which is handy if you organise passkeys alongside related entries. If no group is selected, KeePassPasskey falls back to the Passkeys group.
Entry title: the title given to each new passkey entry. The default is {RP_NAME} (Passkey). You can use {RP_NAME} for the website’s display name, plus any KeePass placeholder such as {USERNAME}, {URL}, or {S:KPEX_PASSKEY_RELYING_PARTY}. Only unprotected fields are resolved in the title. Protected fields such as the password or private key are never exposed.
Resolve title placeholders: when enabled (default), placeholders are resolved when the passkey is created and the resulting text is stored as the title. When disabled, the placeholders are stored as-is so KeePass resolves them each time the entry is shown (useful if you later edit a referenced field). {RP_NAME} is always resolved, because it has no underlying entry field.
Tag new passkeys: when enabled (default), a Passkey tag is added to each entry created when a new passkey is registered.
Offer saving to an existing entry: when enabled (default), passkey creation offers an Add to existing option so you can save the passkey onto a matching entry (by website) instead of always creating a new one. See Saving a passkey to an existing entry. Overwriting an entry’s existing passkey keeps the previous version in the entry’s History.
Allow duplicate passkeys: a website can ask not to register a second passkey for an account it already has one for. This setting controls where that request is enforced:
| Option | Behaviour |
|---|---|
| Don’t check | Always allow a duplicate, even when the website asks not to. |
| Check target database (default) | Block only when the existing passkey is in the database the new one would be saved to. |
| Check all databases | Block when the existing passkey is in any open database. |
Relax this if you deliberately keep the same account’s passkey in more than one database and a site refuses to register it again.
Advanced#
These settings are rarely needed. Leave them at their defaults unless you are troubleshooting.
| Setting | Description |
|---|---|
| Log level | Verbosity of log files. Increase to Debug when reporting a bug, or set to Off to disable logging entirely. |
| Status refresh interval | How often the app polls for connection status. |
| Sync passkeys to Windows | Make your passkeys appear in the Windows sign-in prompt. Be aware: when off, passkeys will not appear in autofill suggestions or in the selection list, which prevents sign-in on most sites. Turning it off removes them from Windows immediately. |
Expert#
Advanced options for uncommon setups. Leave them at their defaults unless you specifically need a different value.
Backup flags#
These control the backup flags (BE/BS) written to newly created passkeys. Changing them can make some websites reject the passkey. The defaults are both On.
| Setting | Description |
|---|---|
| Backup Eligibility (BE) | When On (default), websites are told that new passkeys are allowed to be backed up and synced to your other devices. When Off, they are told the passkey is saved on a single device only. |
| Backup State (BS) | When On (default), websites are told that new passkeys are backed up right now. Only available while Backup Eligibility is On; turning eligibility off automatically turns this off too. |
These are the defaults for new passkeys. Each passkey stores its own KPEX_PASSKEY_FLAG_BE/KPEX_PASSKEY_FLAG_BS values, which are replayed on every sign-in. To change the flags on an existing passkey, edit those fields directly in the entry’s Advanced tab in KeePass (1 = on, 0 = off).
Spoof AAGUID#
The AAGUID is a fixed identifier that tells a website which authenticator created a passkey. By default KeePassPasskey reports its own AAGUID. This setting lets you override it, for example to report a neutral all-zero value or to match another authenticator model.
To change it, type a GUID into the field and click Apply. Applying re-registers the authenticator with Windows with the new value. Leave the field empty and click Apply to go back to the built-in default. The value is saved on this device only; it is not stored in your database and does not follow the database to other machines.
| Field | Description |
|---|---|
| Spoof AAGUID | The GUID to report. Must be a valid GUID (for example 00000000-0000-0000-0000-000000000000), or empty to use the default. |
The AAGUID is only sent when a passkey is created; it is never sent during sign-in, so changing it has no effect on passkeys you already have. A few websites that enforce attestation may reject a passkey whose AAGUID they do not recognise, so change this only if you know why you need to.
FAQ & Troubleshooting#
If something is not working, the FAQ & Troubleshooting page covers the most common questions and fixes, such as why a TPM is required and KeePassPasskey not appearing in the provider list.